Before starting on the main harness manufacture, the aim was to complete modification of all peripheral components & subharness' which would be connected to the main harness.
LH Switchgear
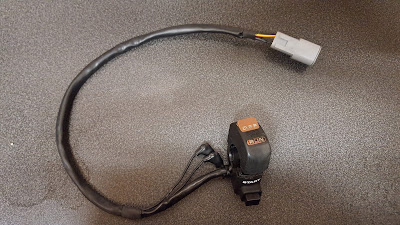
LH Switchgear
The lights & indicator power feeds were spliced together & a nano flasher relay was added on the indicator power feed inside the sub-harness bundle. A connector for the new clutch switch was added and the sub-harness re-terminated with Amphenol ATM sealed connectors.

 |
| Nano Flasher Relay Installed |

RH Switchgear
The original engine run switch & starter switch power feeds were common but as I wanted to seperate their functions, the OEM splice had to be removed to split the feeds into seperate wires. The sub-harness was then finished with an Amphenol ATM sealed connector.

Tail Light Assy
I had replaced the original incandescent bulbs with an LED kit some time ago but had retained the original bulb holders to keep the assembly sealed. Unfortunately that also meant that the wiring was trapped between the original holder and assembly which wasn't ideal.
I took this opportunity to print a pair of lower profile blanking caps to replace the original bulb holders and pass the wiring through a hole in one of the caps. The wiring was then finished with an Amphenol ATM sealed connector.


Crank Angle Sensor
Crank signal noise had been an issue with the Microsquirt installation so I wanted to shield the signal wiring from electrical noise to minimise the effect on the F88R installtion. The original crank angle sensor and wiring was retained again but the sleeving was removed, shielding braid added over the wires, re-sleeved and terminated with a JST JWPF sealed connector.


Neutral Switch
The original neutral switch and wiring was retained but re-terminated with a TE Superseal 1.5 sealed connector.
Indicators
Original indicator assemblies were retained but the old bullet connections were replaced with Delphi Metri-Pack 150 unsealed connectors. The male connector housings were modified slightly by cutting a second slot beside the locking tab. This just allowed the locking tab to be flexible enough to be lifted and undone with one hand which can be quite useful for the front indicators.

Ignition Switch
The ignition switch was just re-terminated with an Amphenol ATM sealed connector. The original wiring is quite heavy as it is designed to carry all the bike power so it is not perfectly suited to the ATM series connector but should work. If it becomes an issue, there may be a possibility to replace the original wires with smaller wires.
Headlight Ballasts
I have upgraded the headlights to LED units which have small ballasts for each side. The kit was designed to be plug-and-play with H4 headlight connectors. As these are quite bulky, I opted to remove the 2off H4 conectors and splice into a single 3-way Amphenol ATM sealed connector.


Ignition Coils Sub-harness
The original wiring was retained for the wasted spark setup. The orginal 3-way connector was removed and replaced with a 6-way Amphenol ATM sealed connector.


Throttle Body Sub-harness
The MAP sensor, idle valve and coolant temperature sensor were removed from the throttle body harness for the F88R installation. The MAP sensor was relocated to the rear shock cross-member and the coolant temperature sensor wiring just bypassed the throttle body harness to make it easier to remove the throttle bodies. The idle valve was removed completely for the F88R installation.
The F88R harness has wiring available for additional sensors but as these are not currently fitted, a temporary new harness was manufactured to interface with existing TPS and air charge temperature sensors and to connect the injectors to be controlled sequentially rather than as 2 banks as with the Microsquirt system.
The throttle body harness is the most likely to evolve over time as new sensors are added so the current level harness is a bit more temporary than everything else.


No comments:
Post a Comment